
•03 Dec 2021
Proxying Legacy Authentication Methods
•03 Feb 2022•14 mins read
Authenticating users in a modern browser-based application against a legacy identity provider can involve juggling technologies from different eras. This is how we built a stateless authentication proxy so our React app could use OpenID Connect to talk to a on-premise WS-Federation identity system.
The problem
For a recent project, we needed to build a new web application for one of our clients with special security requirements:
- The application must authenticate all users using an existing enterprise WS-Federation identity system
- The application must be hosted in a subfolder of the main organisation website
These two requirements pose an interesting architectural problem due to the nature of cookies, and their use as mechanisms for maintaining an authenticated session. In fact, it’s only the combination of these two requirements that presents a problem; if either one were removed we wouldn’t have needed to use the solution outlined below.
What is WS-Federation?
WS-Federation has been around a long time. It is part of the WS-Security framework that was originally developed by Microsoft, IBM, RSA Verisign and others in 2003. The latest version (1.2) was published in 2009. At that time, modern Javascript frameworks as we know them didn’t exist (the first versions of AngularJS and Knockout.JS were created in 2010, React in 2013, and Vue.js in 2014), and webpages were still rendered either entirely on the server, or as an HTML fragment that was AJAX’d into one of your components by your browser JavaScript.
So naturally, the WS-Security framework wasn’t designed for browsers, it was designed for back-end servers who talked to each other using SOAP messages. The WS-Federation extension extends the WS-Security concept for use by browsers, grafting the underlying messages onto pieces of the HTTP protocol (GET and POST requests, redirects, and cookies).
Crucially, the token issued by the Token Service must be submitted back to the requesting application via a POST to a well-known URL, which neither a Javascript Single Page Application or other modern clients like a native mobile app can support without the help of a back-end server to do the processing.
Take-away: WS-Federation requires a back-end server with cookie support to do the processing.
Cookies for everyone
Most websites you go to will store your authentication state locally, either in a cookie or in LocalStorage. Browsers have security and sandboxing mechanisms in place to stop unauthorized access to these data stores, but there are limitations which make them inappropriate for this solution.
Both cookies and LocalStorage are accessible to any page running on the same origin (protocol/domain/port, eg. https://www.example.com:443). Cookies can also be accessed by other services running on other protocols (eg. ftp) and other ports (eg. 80). Cookies have a “path” attribute that limits which cookies are sent to the server based on the path of the page; this WOULD solve the problem except most browsers don’t enforce that restriction in their client-side APIs.
As a result, if your web app is hosted on your main organizational domain, any cookies for that site are readable (and potentially hijackable) by any application or page also hosted on that domain. if we deployed either a traditional server-rendered website or a single page application with both front- and back-end routes underneath that sub-folder, all our cookies are potentially at risk.
Take-away: Hosting the app on the main domain means we can’t use cookies.
A New Identity Server
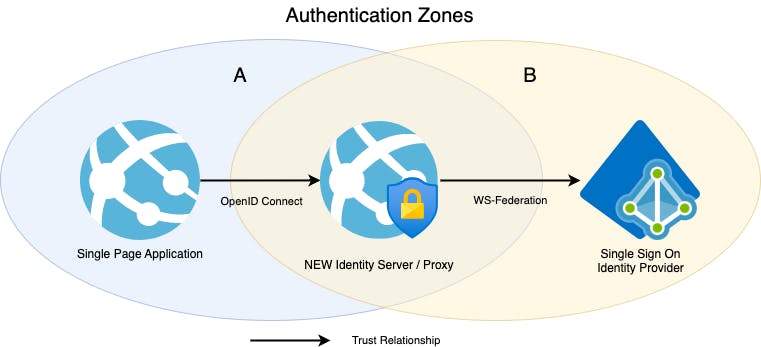
Our solution to this problem was to create a new identity server that acts as a proxy between the WS-Federation protocol and the OpenID Connect one. In essence, we setup two different authentication zones with a trust relationship. We told our new identity server to trust the Active Directory server, and then told our web app and backend to trust our Identity server.
One option for the identity server would be to use the standard ASP.NET Identity with WS-Federation configured as an external login provider. You can achieve this pretty easily by following along with the Microsoft How-To articles.
The Microsoft.AspNetCore.Authentication.WsFederation package contains a AddWsFederation extension method that configures the middleware:
public void ConfigureServices(IServiceCollection services)
{
    services.AddDbContext<ApplicationDbContext>(options =>
        options.UseSqlServer(
            Configuration.GetConnectionString("DefaultConnection")));
    services.AddDefaultIdentity<IdentityUser>(options => options.SignIn.RequireConfirmedAccount = true)
        .AddEntityFrameworkStores<ApplicationDbContext>();


    services.AddAuthentication()
        .AddWsFederation(options =>
        {
            // MetadataAddress represents the Active Directory instance used to authenticate users.
            options.MetadataAddress = "https://<ADFS FQDN or AAD tenant>/FederationMetadata/2007-06/FederationMetadata.xml";

            // Wtrealm is the app's identifier in the Active Directory instance.
            // For ADFS, use the relying party's identifier, its WS-Federation Passive protocol URL:
            options.Wtrealm = "https://localhost:44307/";

            // For AAD, use the Application ID URI from the app registration's Overview blade:
            options.Wtrealm = "api://bbd35166-7c13-49f3-8041-9551f2847b69";
        });

    services.AddControllersWithViews();
    services.AddRazorPages();
}
Once you have an identity server that can authenticate your users through your WS-Federation Active Directory, the next step is to add another middleware provider that supports ISSUING tokens for your users. Because we wanted to support a modern Javascript Single Page Application and a REST API backend, we chose to use the OpenID Connect protocol.
While Microsoft doesn’t have a package out of the box that supports issuing JWT tokens, you can roll your own or use one of the commercial or community supported ones. The Microsoft documentation provides links one of the most popular ones, Duende Identity Server (and its predecessor IdentityServer4).
Here is a snippet from the latest version of Duende Identity Server quick start. At its core, the Identity Server is configured by adding a call to the services.AddIdentityServer() extension method. The AddAspNetIdentity() call connects Identity Server to the Asp.Net identity framework you already set up. Notice that this snippet also supports external authentication, only for Google rather than WS-Federation.
public void ConfigureServices(IServiceCollection services)
{
    services.AddControllersWithViews();

    services.AddDbContext<ApplicationDbContext>(options =>
        options.UseSqlite(Configuration.GetConnectionString("DefaultConnection"),
            o => o.MigrationsAssembly(typeof(Startup).Assembly.FullName)));

    services.AddIdentity<ApplicationUser, IdentityRole>()
        .AddEntityFrameworkStores<ApplicationDbContext>()
        .AddDefaultTokenProviders();

    var builder = services.AddIdentityServer(options =>
    {
        options.Events.RaiseErrorEvents = true;
        options.Events.RaiseInformationEvents = true;
        options.Events.RaiseFailureEvents = true;
        options.Events.RaiseSuccessEvents = true;

        // see https://docs.duendesoftware.com/identityserver/v5/fundamentals/resources/
        options.EmitStaticAudienceClaim = true;
    })
        .AddInMemoryIdentityResources(Config.IdentityResources)
        .AddInMemoryApiScopes(Config.ApiScopes)
        .AddInMemoryClients(Config.Clients)
        .AddAspNetIdentity<ApplicationUser>();

    services.AddAuthentication()
        .AddGoogle(options =>
        {
            options.SignInScheme = IdentityServerConstants.ExternalCookieAuthenticationScheme;

            // register your IdentityServer with Google at https://console.developers.google.com
            // enable the Google+ API
            // set the redirect URI to https://localhost:5001/signin-google
            options.ClientId = "copy client ID from Google here";
            options.ClientSecret = "copy client secret from Google here";
        });
}
This combination of packages combines to give a very nice identity server and helps establish a separate authentication zone:
- ASP.Net Core Identity acts as your database and stores your list of users along with their external identifiers
- ASP.Net Core WSFederation Authentication acts as an external authentication service
- Duende Identity Server issues the JWT tokens for your single-page application using OpenID Connect
Proxying for A Leaner Solution
Establishing your own Authentication Zone comes with its own limitations:
- You must maintain a copy of the user’s logon data in a database somewhere, with its own maintenance and backup plans
- The user’s logon state is stored in an ASP.Net Identity cookie you issued from your identity server
- The lifetime of the user’s logon session is determined by your Identity server, rather than by the WS-Federation system *
* You can overcome this if required by registering and setting up the log-out protocols between the various servers as well, but the protocols are complicated and have a lot less out-of-the-box support (especially with single-page-applications). Most people find it easier to reduce the session or access token lifetime instead.
Our client was keen to avoid additional databases, both for a maintenance and privacy standpoint, so as part of a second project within the same umbrella, we looked to see if we could create a proxy instead.
We had used OpenIddict (an Open Source OpenID Connect framework) in other projects where Identity Server was not a good fit, and discovered that they had just released a new degraded mode designed for very similar requirements. The principal maintainer had documented how to use it to proxy between two different OpenId systems here, so we used a similar approach to create a WSFederation proxy.
Here are some snippets from a sample ConfigureServices method:
services
    .AddAuthentication(options =>
    {
        options.DefaultScheme = CookieAuthenticationDefaults.AuthenticationScheme;
        options.DefaultChallengeScheme = WsFederationDefaults.AuthenticationScheme;
    })
    .AddWsFederation(options =>
    {
        options.Wtrealm = Configuration["wsfederation_realm"];
        options.MetadataAddress = Configuration["wsfederation_metadata"];
    })
    .AddCookie();
This section adds the normal asp.net core cookie authentication and support for WS Federation. Note that we have configured the Default scheme to be the Cookie scheme, but the default challenge scheme to be the WSFederation one. This setup means that if NO cookie is detected, instead of using the cookie scheme’s challenge (which would normally be to redirect you to the login page of the site), it will trigger the WSFederation middleware, which will start the WSFederation login process.
services
    .AddOpenIddict()
    .AddServer(options =>
    {
        options.AddDevelopmentEncryptionCertificate()
                .AddDevelopmentSigningCertificate();

        options.AllowAuthorizationCodeFlow()
                .AllowHybridFlow();

        options.RegisterScopes(Scopes.OpenId, Scopes.Profile, Scopes.Email);

        options.SetAuthorizationEndpointUris("/connect/authorize")
                .SetUserinfoEndpointUris("/connect/userinfo")
                .SetTokenEndpointUris("/connect/token");

        options.EnableDegradedMode();

        options.AddEventHandler<ValidateAuthorizationRequestContext>(builder => builder.UseSingletonHandler<Events.ValidateAuthorizationRequestHandler>());
        options.AddEventHandler<ValidateTokenRequestContext>(builder => builder.UseSingletonHandler<Events.ValidateTokenRequestHandler>());
        options.AddEventHandler<HandleAuthorizationRequestContext>(builder => builder.UseSingletonHandler<Events.AuthorizationRequestHandler>());

        options.UseAspNetCore();
    })
    .AddValidation(options =>
    {
        options.UseLocalServer();
        options.UseAspNetCore();
    });
This section adds the OpenIddict support – with both the server and validation middleware modules. As we are using degraded mode there is no database or handling provided out of the box, so you have to configure your own. You can see we’ve hooked into 3 events in the OpenIddict pipeline:
- ValidateAuthorizationRequest
- ValidateTokenRequest
- HandleAuthorizationRequest
The ValidateAuthorizationRequest and ValidateTokenRequest check the requests against the list of allowed OpenId clients and options. The HandleAuthorizationRequest acts as the glue linking the two systems.
Here is a snippet from the HandleAuthorizationRequest class:
public async ValueTask HandleAsync(HandleAuthorizationRequestContext context)
{
    var request = context.Transaction.GetHttpRequest() ??
            throw new InvalidOperationException("The ASP.NET Core request cannot be retrieved.");

    // Retrieve the security principal created by the WsFederation handler and stored in the authentication cookie.
    // If the principal cannot be retrieved, this indicates that the user is not logged in. In this case,
    // an authentication challenge is triggered to redirect the user to WsFederation's authentication endpoint.
    var principal = (await request.HttpContext.AuthenticateAsync(WsFederationDefaults.AuthenticationScheme))?.Principal;
    if (principal == null)
    {
        await request.HttpContext.ChallengeAsync(WsFederationDefaults.AuthenticationScheme);
        context.HandleRequest();
        return;
    }

    var identity = new ClaimsIdentity(TokenValidationParameters.DefaultAuthenticationType);

    // Use the "http://schemas.xmlsoap.org/ws/2005/05/identity/claims/name" claim
    // (added by the WSFederation handler to store the user identifier) as the OIDC "sub" claim.
    identity.AddClaim(new Claim(Claims.Subject, principal.GetClaim(ClaimTypes.Name)));

    // If needed, you can copy more claims from the cookies principal to the bearer principal.
    // Mark all the added claims as being allowed to be persisted in the access token,
    // so that the API controllers can retrieve them from the ClaimsPrincipal instance.
    foreach (var claim in identity.Claims)
    {
        claim.SetDestinations(GetDestinations(claim, context.Request));
    }

    // Attach the principal to the authorization context, so that an OpenID Connect response
    // with an authorization code can be generated by the OpenIddict server services.
    context.Principal = new ClaimsPrincipal(identity);
    context.Principal.SetScopes(context.Request.GetScopes());

    // Sign the user OUT of the cookie provider
    await request.HttpContext.SignOutAsync(CookieAuthenticationDefaults.AuthenticationScheme);
}
Note that at the end we ALSO sign the user OUT of the Cookie Authentication scheme. This ensures that we aren’t inadvertently authenticating the user with our cookie instead of passing the request on, and means that every time the user requests new tokens we will redirect them to the WSFederation provider to complete their authentication.
Here’s the sequence diagram showing the whole process:
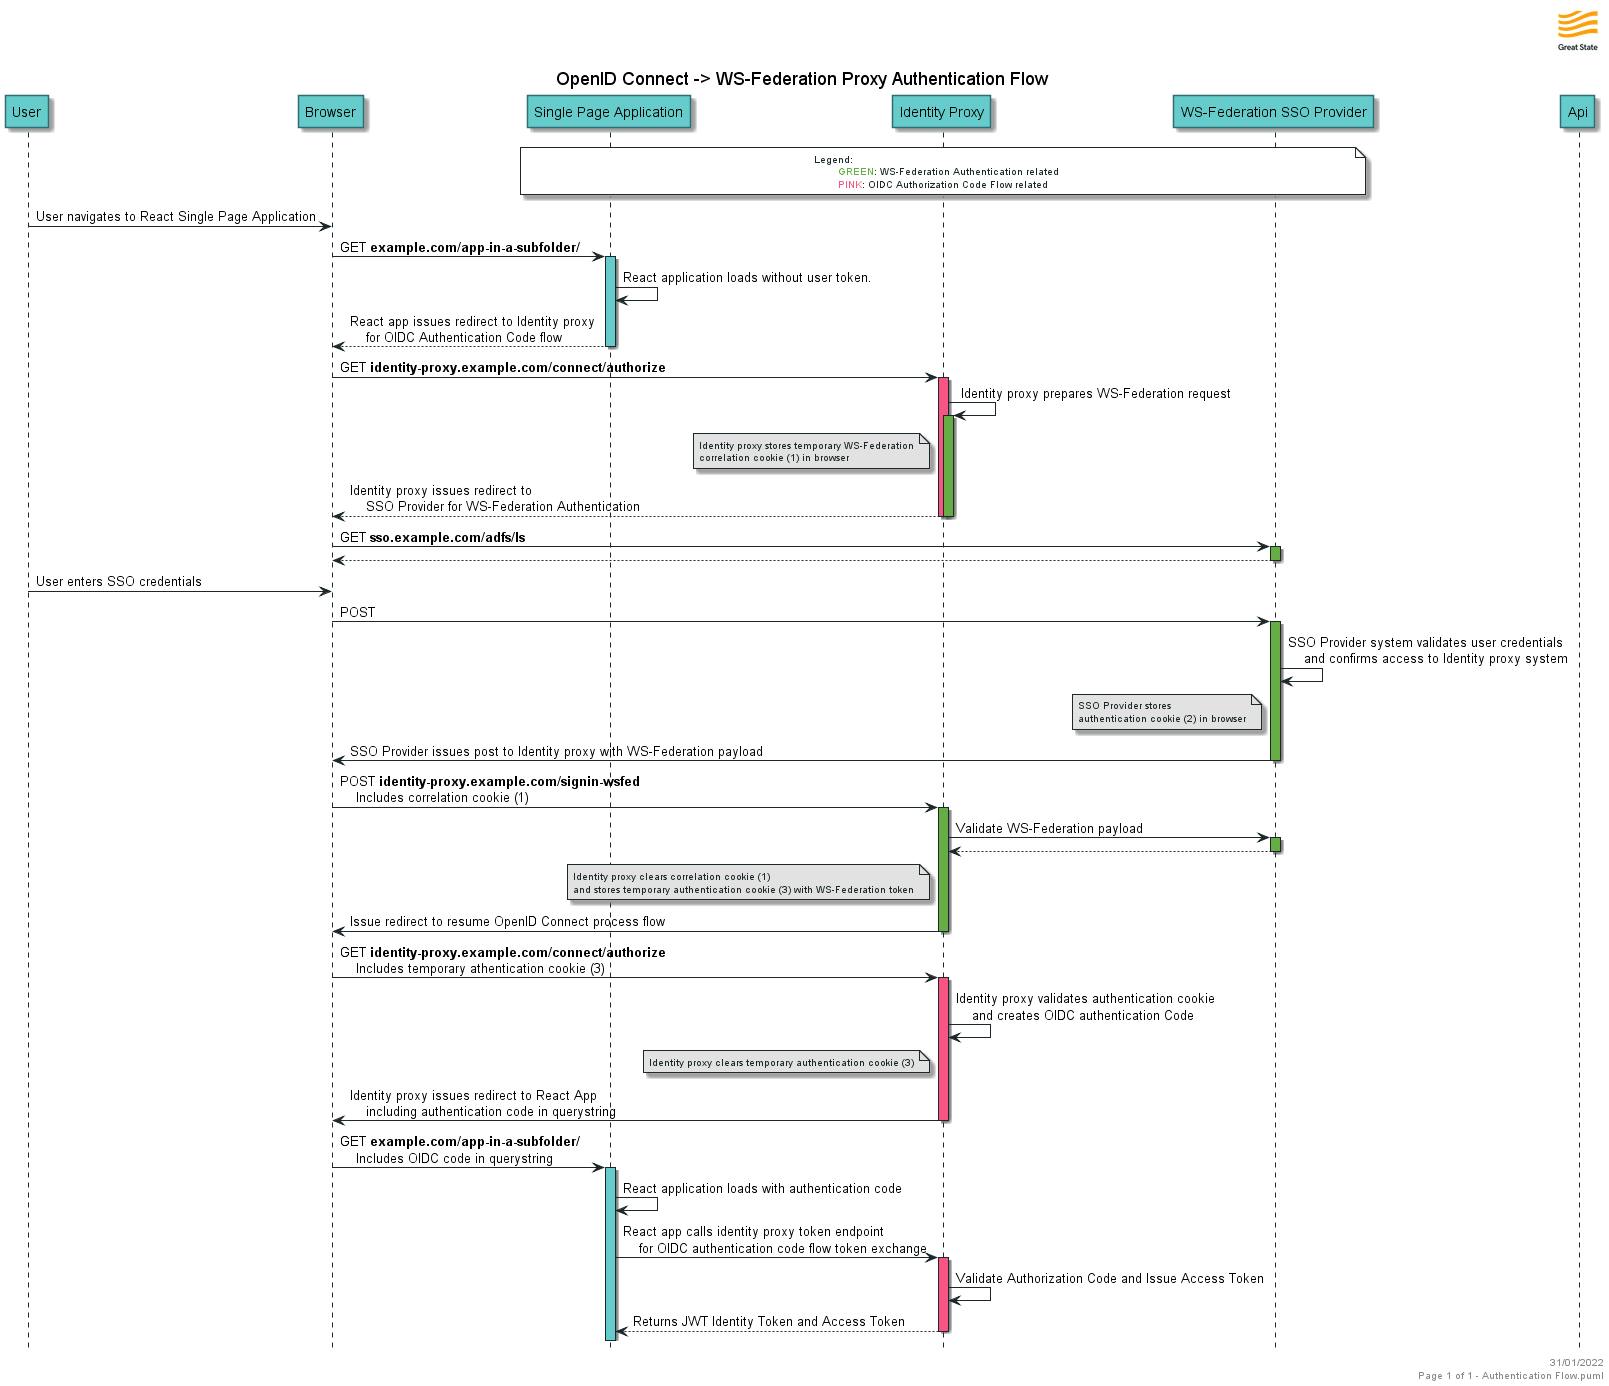
Using OpenIddict degraded mode allowed us to remove the need for a database and gave us a clean and simple proxy system for our single-page applications.
Summary
Whether you choose to use the fully-featured Identity Server or the slimmed down model is dependent on your specific requirements.
It would be a good fit if you need to store or enrich the user’s data with input from other sources, or allow them to customize their access within your authentication zone separately from the WSFederation one.
On the other hand, if you want to reduce your database maintenance overhead or have strict personal information storage processing requirements, the slimmed down version may suit better.